How to Get a Vietnam Visa

Planning a trip to Vietnam? Here's how to get a Vietnam visa.
This Southeast Asian country is so diverse yet manages to appeal to a variety of visitors. Whether you're a history lover, adventure traveler, foodie, beach lover, or budget traveler, you'll feel at home in Vietnam.
If you're from one of 171 countries, including the United States, you'll need an entry visa to visit Vietnam. No worries, because it's easy to apply for a visa.
United Kingdom, France, Spain, Italy, and Germany passport holders have a 15-day free visa exemption through June 2020.
You do not need a visa if you're traveling straight to Phu Quoc Island and not visiting any other cities in Vietnam.
But it's easy to get a visa to visit Vietnam. Keep reading to learn how to get a Vietnam visa.
This is the ultimate guide on visas for Vietnam lists all the ways you can get a visa to visit Vietnam, everything you need to know about Vietnam visas, and how to apply online for a Vietnam e-visa.
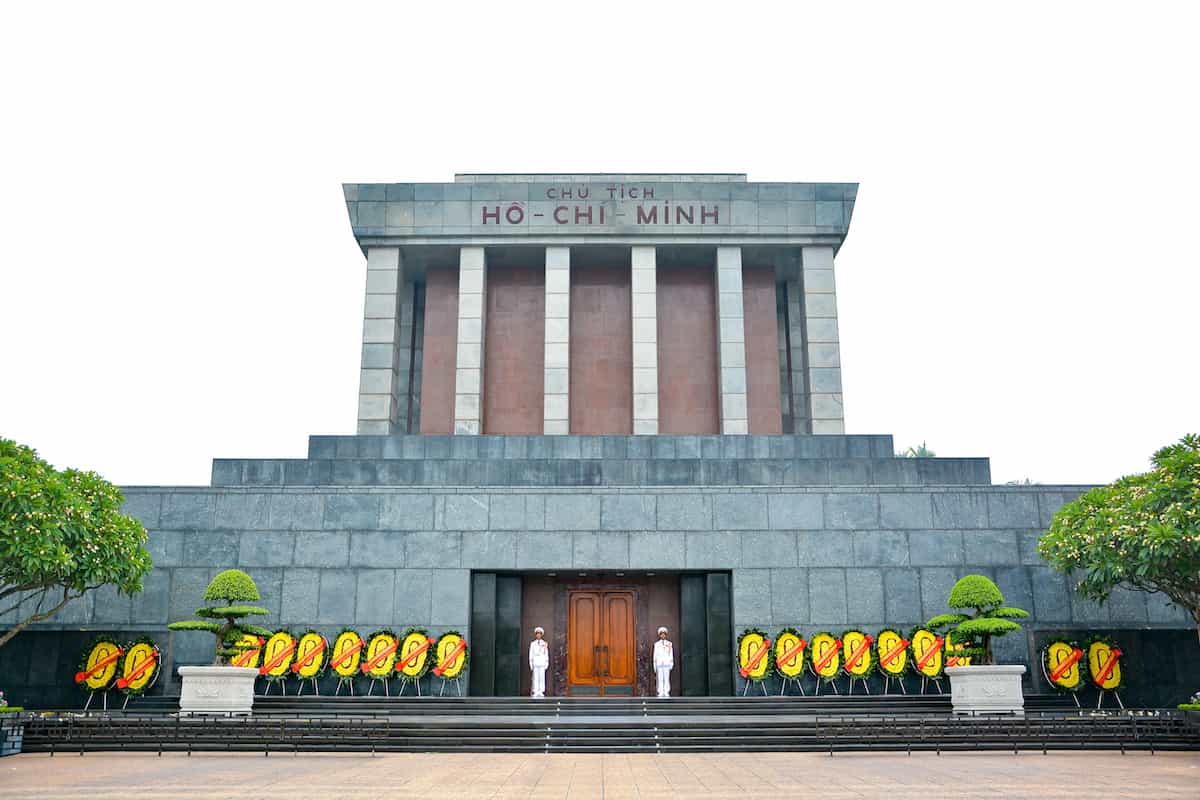
While you're in Vietnam here what you need to know if you're going to visit the Ho Chi Minh Mauseolem.
How to Get a Vietnam Visa

There are five different ways you can get a visa to visit Vietnam: online (e-visa), in person, by mail, or on arrival.
1. Online (e-visa)
An online e-visa (electronic visa) is the easiest, quickest, and cheapest way to get a Vietnam visa.
The Vietnam Immigration Department processes Vietnam e-visas so you don't have to worry about the validity of your visa. This is the best way to get a visa to visit Vietnam.
Cost: $25 plus $0.96 fee = $25.96.
I paid with my Chase Sapphire Reserve® Card so I could get 3x Chase Ultimate Rewards points.
Vietnam accepts e-visas at all international airports in Vietnam and the following land ports and seaports:
- Nam Can Landport
- Song Tien Landport
- Tinh Bien Landport
- Xa Mat Landport
- Mong Cai Landport
- Moc Bai Landport
- Lao Bao Landport
- Ha Tien Landport
- Huu Nghi Landport
- Cau Treo Landport
- Cha Lo Landport
- Bo Y Landport
- Lao Cai Landport
- Ho Chi Minh City Seaport
- Quy Nhon Seaport
- Nha Trang Seaport
- Hai Phong Seaport
- Hon Gai Seaport
- Da Nang Seaport
- Vung Tau Seaport
This is the process I've used to apply for a visa to visit Vietnam for all six of my trips where my first trip started in Kuala Lumpur.
Because I flew Business Class from Los Angeles I got to use the Star Alliance Business Class Lounge.
It can take up to 3 business days to process a Vietnam e-visa. But if you time it right, you'll have it the next day.
Pro-tip: Monday at 9:44 am PST was the golden time for me. I got my e-visa to visit Vietnam the next day.
Once approved, you'll get an email notification. You have to print and bring your Vietnam visa.
Eligible Countries
Citizens of these countries are eligible for an e-visa:
- Antarctica
- Argentina
- Armenia
- Australia
- Azerbaijan
- Belarus
- Brunei
- Bulgaria
- Canada
- Chile
- China (with a traditional passport NOT a Chinese e-Passport)
- Columbia
- Cuba
- Czech Republic
- Denmark
- Finland
- France
- French Polynesia
- Germany
- Greece
- Hungary
- India
- Ireland
- Isle of Man
- Italy
- Japan
- Kazakhstan
- Luxembourg
- Mongolia
- Myanmar
- Netherlands
- New Zealand
- Northern Mariana Islands
- Norway
- Panama
- Peru
- Philippines
- Poland
- Romania
- Russia
- Saint Martin
- Slovakia
- South Korea
- Spain
- Sweden
- Timor-Leste
- United Arab Emirates
- United Kingdom
- United States of America
- Uruguay
- Venezuela
- Virgin Islands, US
Scroll down for step-by-step instructions on how to apply for a Vietnam Visa online.
2. In Person at an Embassy
You can apply for a Vietnam visa in person at the Embassy of Vietnam.
Cost: $80 for single entry 30-day visa; $135 for multiple entry one year visa. Expedited processing is $30.
There is only one Vietnam Embassy in the US. It's located at 1233 20th Street NW, Suite 400, Washington, DC 20036.
Embassy hours are 9 am to 12 pm and 2 pm to 4:30 pm, Monday to Friday. All hours are Eastern Time. Closed on weekends, US and Vietnam holidays.
Pro-tip: Appointments are not required.
While there is only one embassy, there are three Vietnam consulates in the US where you can apply for a Vietnam visa: New York, San Francisco, and Houston.
Documents to bring:
- Completed Vietnam visa application form (fill out online, print, sign and bring with you. If you can't complete the via application online, you can download one.
- Passport with at least 6 months of validity before you plan to enter Vietnam
- Passport photo: One 2x2 if you want a sticker in your passport or Two 2x2 photos if you want a loose visa (a regular piece of paper)
- Visa fees: acceptable forms of payment are cash, money order, check, or credit card.
- Supporting documents: invitation letter from sponsor/host if required
- Prepaid SASE (self-addressed stamped envelope): to mail your passport and/or visa. It's better to use FedEx and UPS for tracking.
Pro-tip: Vietnamese with a US Permanent Resident Card (Green Card) can apply for a Visa Exemption Certificate (aka a Vietnam 5-year visa).
It takes 3 business days to process a visa for Vietnam when you apply in person.
Expedited service is available for $30.
Pro-tip: Diplomats and official visas are free. Tourist and business visas are not.
3. By Mail
You can get a Vietnam visa by mail.
Cost: $80 for single entry 30-day visa; $135 for multiple entry one year visa. Expedited processing is $30.
Complete the Vietnam visa application, print, sign, and mail to the Embassy of Vietnam in DC: 1233 20th Street NW, Suite 400, Washington, DC 20036.
Documents needed:
- Completed Vietnam visa application form
- Passport with at least 6 months of validity before you plan to enter Vietnam
- Passport photo: one 2x2 if you want a sticker in your passport or 2 2x2 photos if you want a loose visa (a regular piece of paper)
- Visa fees: money order or check payable to "Embassy of Vietnam"
- Supporting documents: invitation letter from sponsor/host if required
- Prepaid SASE (self-addressed stamped envelope): to mail your passport and visa. Use FedEx and UPS for tracking.
Applying for a Vietnam visa by mail takes 3 business days to process from the time they receive your application.
You can request expedited service for an additional fee of $30.
4. By Email
You can also get your Vietnam visa by email.
Cost: $80 for single entry 30-day visa; $135 for multiple entry one year visa. Expedited processing is $30.
Complete the Vietnam visa application online, print, and email to the Embassy of Vietnam in DC at [email protected]
Pro-tip: Signature is NOT required on your application when you apply for a visa to visit Vietnam by email.
Documents needed:
- Completed Vietnam visa application form
- Data page of passport: jpg, jpeg, png, or gif
- Passport photo: one 2x2 in jpg, jpeg, or png. Taken within the last year, no smiling, no hat, no dark or tinted glasses.
- Visa fees: credit card information (Mastercard or Visa)
- Supporting documents: invitation letter from sponsor/host if required
- Prepaid SASE (self-addressed stamped envelope): to mail your passport and visa. Use FedEx and UPS for tracking.
Applying for a Vietnam visa by email takes 2 business days to process from the time they receive your application.
You can request expedited service (24-hour processing for an additional fee of $30.
5. Visa on Arrival
You can get a visa on arrival to visit Vietnam. This is also called a landing visa.
Cost: $43 to $235.
A visa on arrival only applies if you fly into Vietnam.
You can not get a visa on arrival (landing visa) if you arrive into Vietnam by car or ship.
But contrary to how it sounds, there are some steps involved before you get to Vietnam. Here's how to get a visa on arrival.
Step 1. Apply Online for Approval Letter
You have to apply online for an approval letter from a Vietnamese agency. This can take 3 to 5 business days. You can request urgent processing done in 8 business hours for an additional fee.
Information needed:
- Full name (as shown on passport)
- Gender
- Nationality
- Date of birth
- Passport number
- Passport expiration date
- Date of arrival
- Arrival Airport
- Purpose of visit
- Type of Vietnam visa (1 or 3 month, single or multiple entry)
Step 2. Print
Once you've received your approval letter by email, print your copy.
Step 3. Bring 2 Passport Photos
Bring 2 passport-sized photos and your passport (valid for at least 6 months at the time you enter Vietnam).
Step 4. Pay Visa Fees
Fees for a visa on arrival depends on if you want a single entry, multiple entry, and how long you're staying:
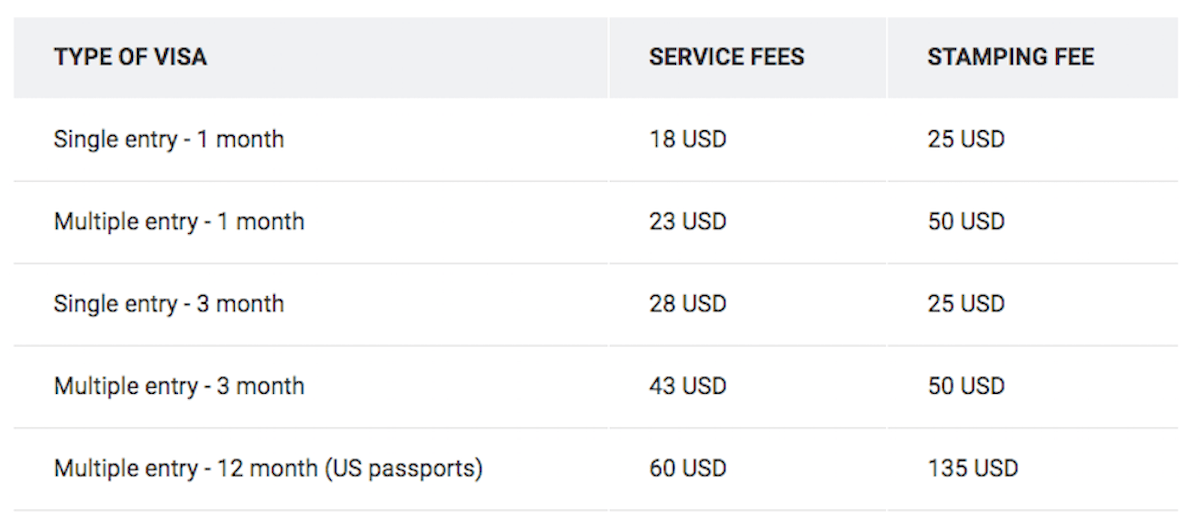
Service fees vary among the Vietnamese agencies.
Pro-tip: Cash only.
Step 5. Bring Everything
Bring everything listed above and present it upon arrival at the Visa Upon Arrival desk when you fly into one of these airports in Vietnam:
- Danang
- Hai Phong
- Hanoi
- Ho Chi Minh City
- Nha Trang
Pro-tip: This should be your last resort for getting a visa to visit Vietnam.
Because you have to wait in line to submit your paperwork AND wait in line for processing.
If there's a tour group in front of you, it could take hours. But you could get lucky and only have to wait an hour or so.
Personally, I'd rather apply online, go about my regular business, and get my visa in a day or two. Without waiting in line.
How to Apply for a Vietnam Visa Online
I'm a big fan of fast, cheap, and easy so I applied for a Vietnam visa online through the Vietnam government. It takes less than 10 minutes.
The cost is $25.96 and you can apply anytime or wait until a week or so before you leave.
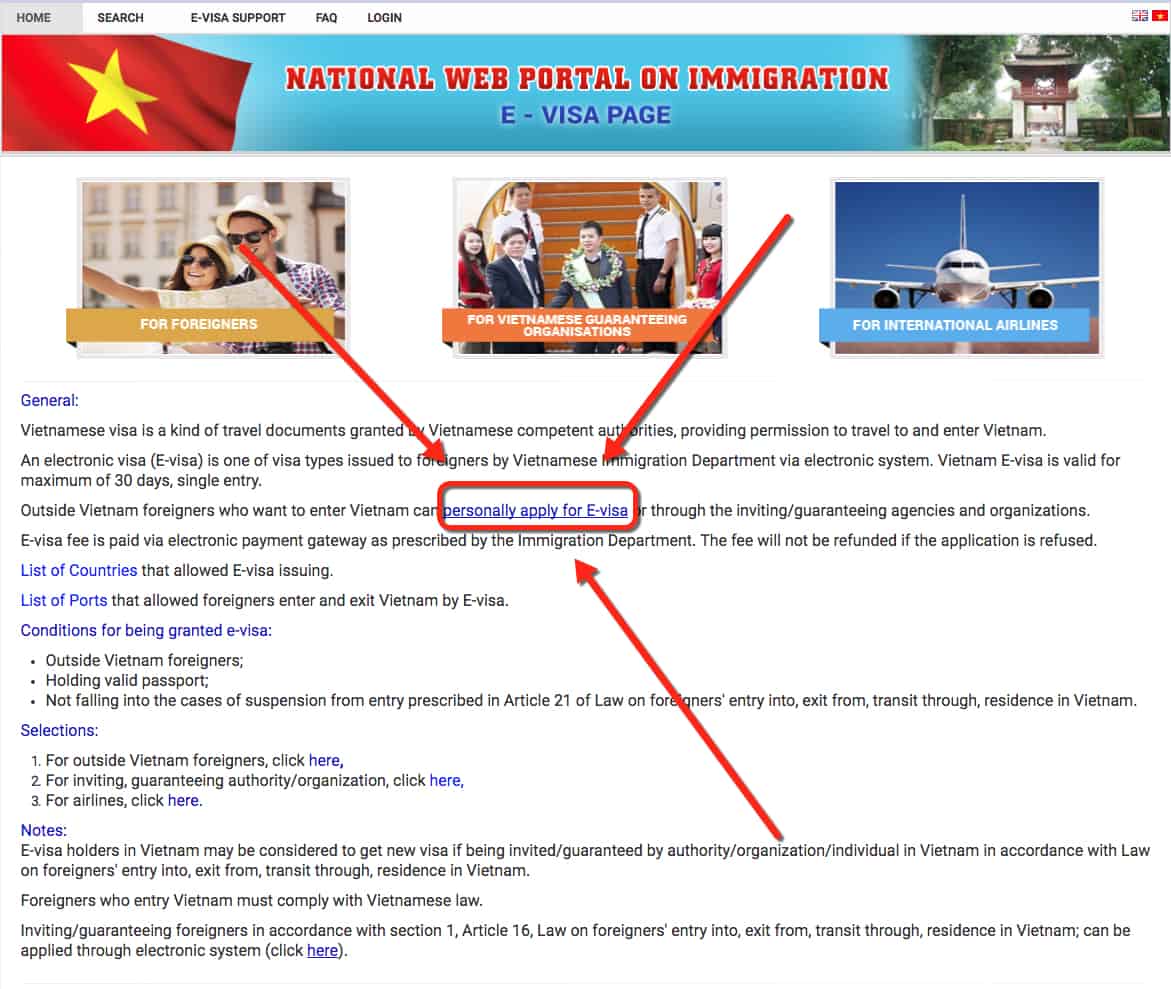
Step 1. Click on "Personally apply for E-visa"
Step 2. Read and Confirm
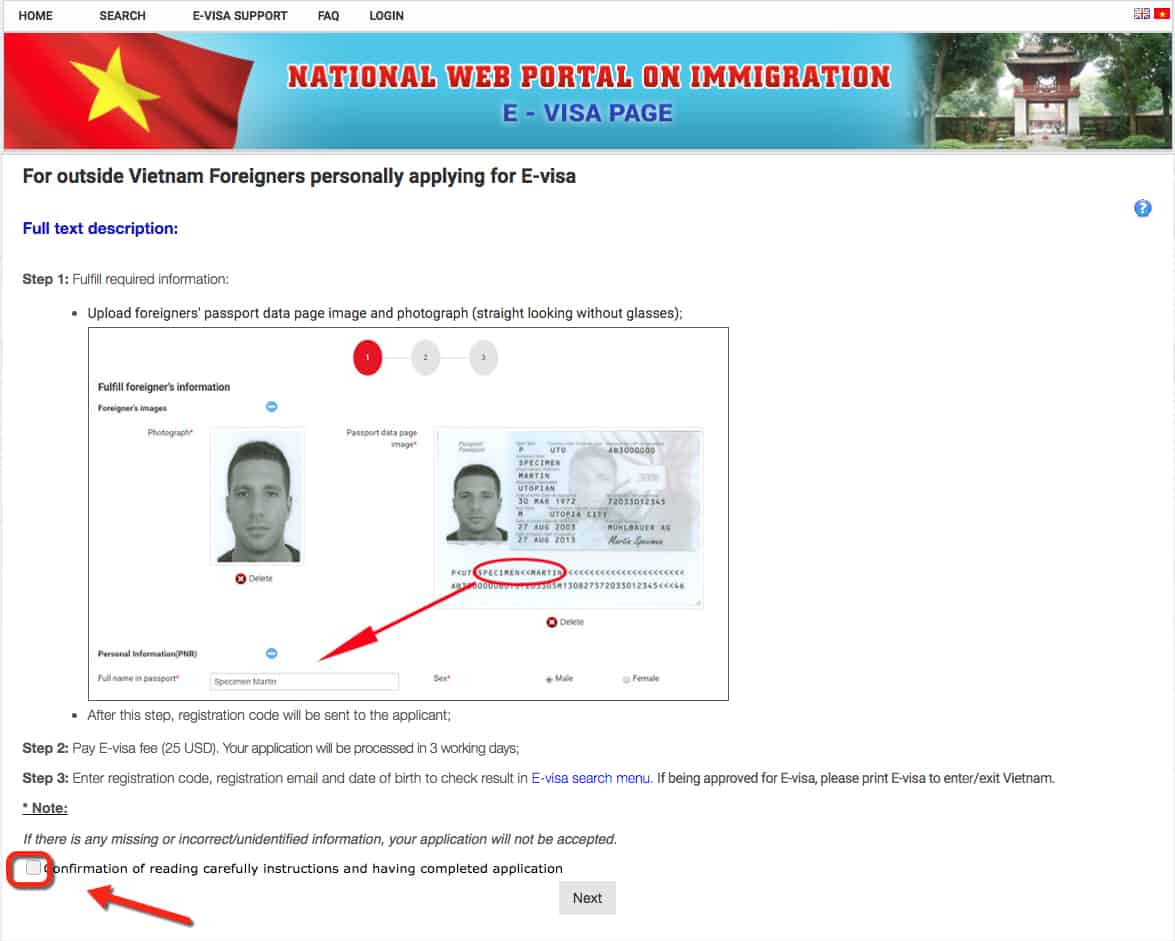
Read and confirm you've read the instructions by checking the box. Then click the gray "Next" box.
Step 3. Enter Personal Information
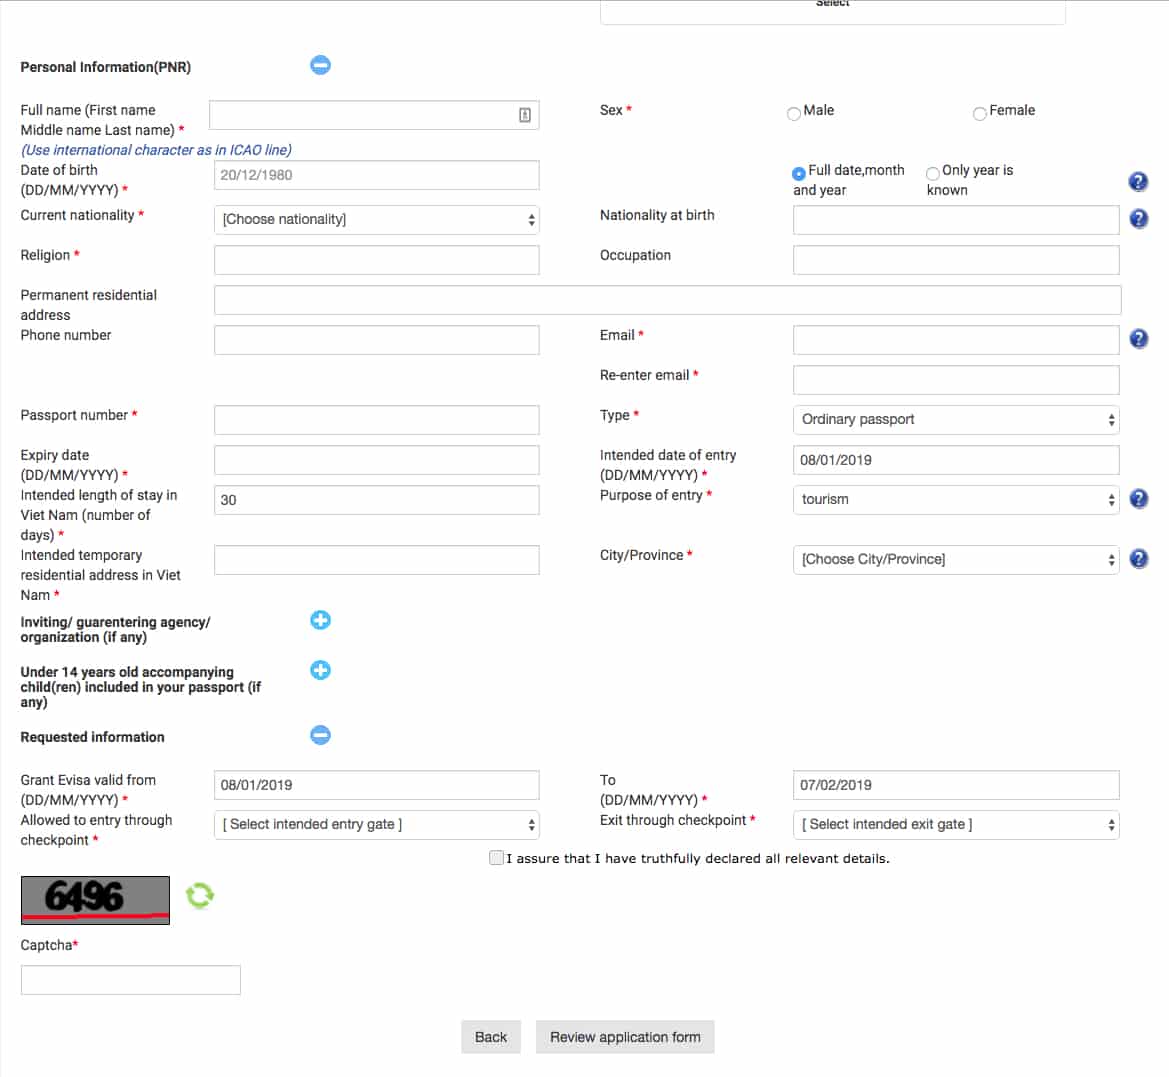
Fill out the form and enter your personal information.
List the address of the hotel you're staying at under "Intended temporary residential address in Vietnam."
In Hanoi, the Hilton Garden Inn Hanoi is the best budget hotel in the French Quarter and a short walk to the Opera House.
Pro-tip: If you're Christian, you can safely put Christian under religion.
When finished, add the Captcha, then click the gray "Review application form" box.
Pro-tip: Make sure you put the correct arrival date.
Step 4. Upload Passport Photo and Passport Data Page
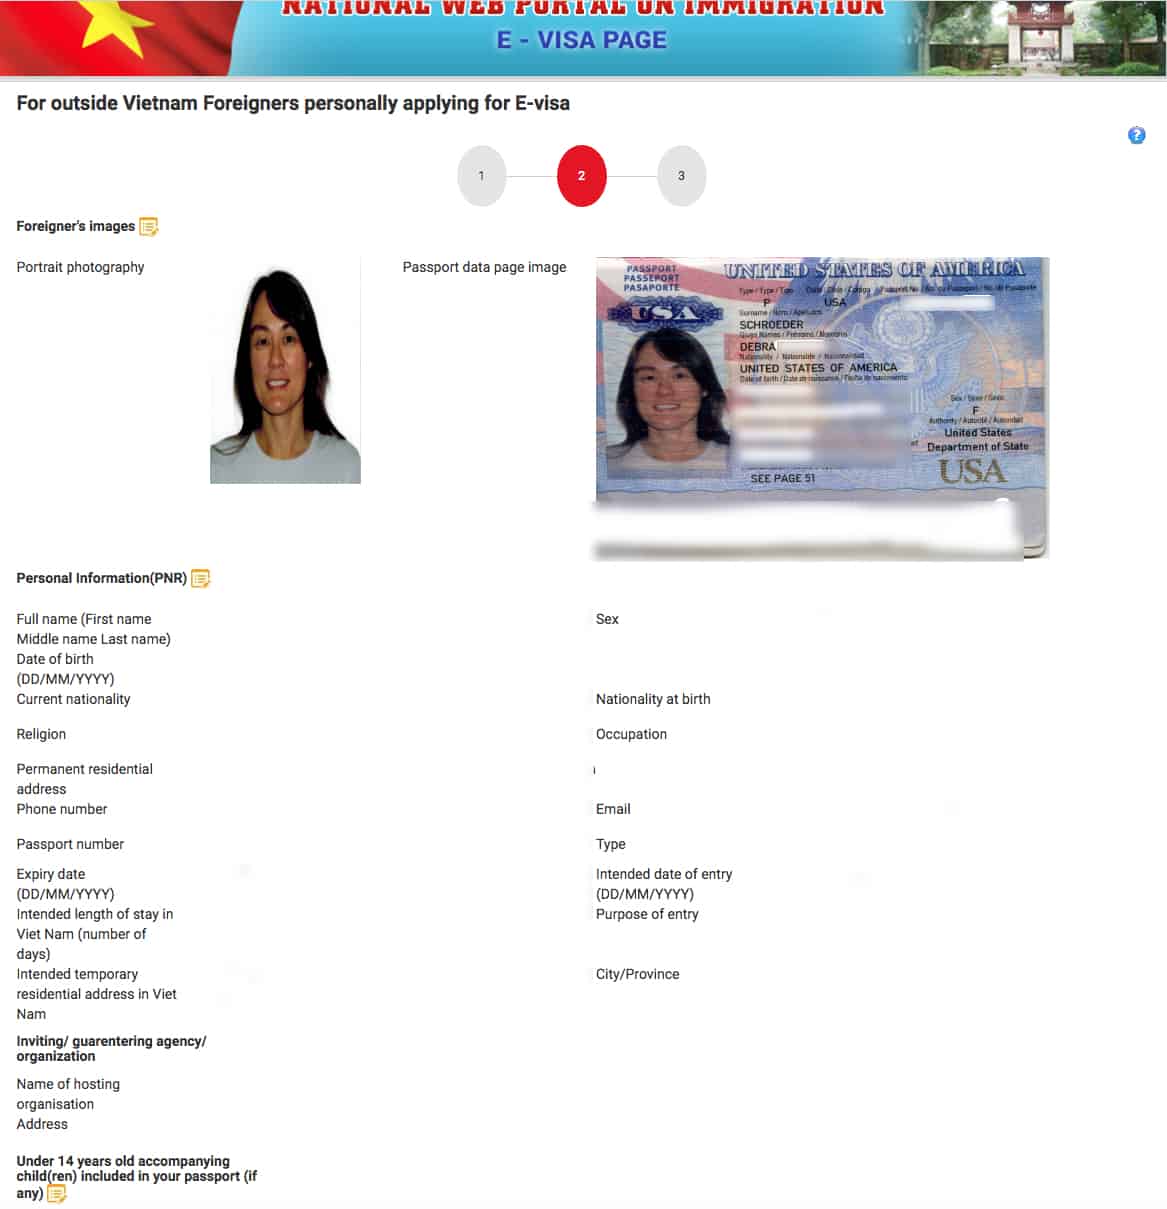
Upload your passport photo and passport data page.
I scanned mine into my computer before I started filling out the online Vietnam e-visa application.
Confirm your information is correct then click "Next."
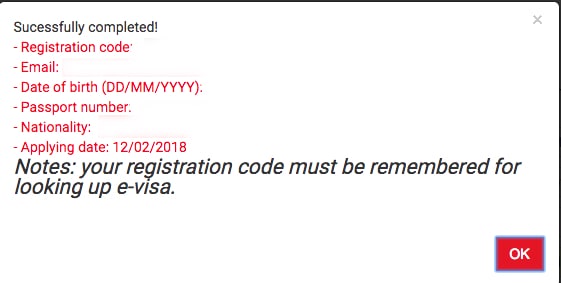
You'll be taken to a completed page showing your registration code. Take a screenshot or write down your registration code.
Step 5. Agree and Pay e-visa Fee
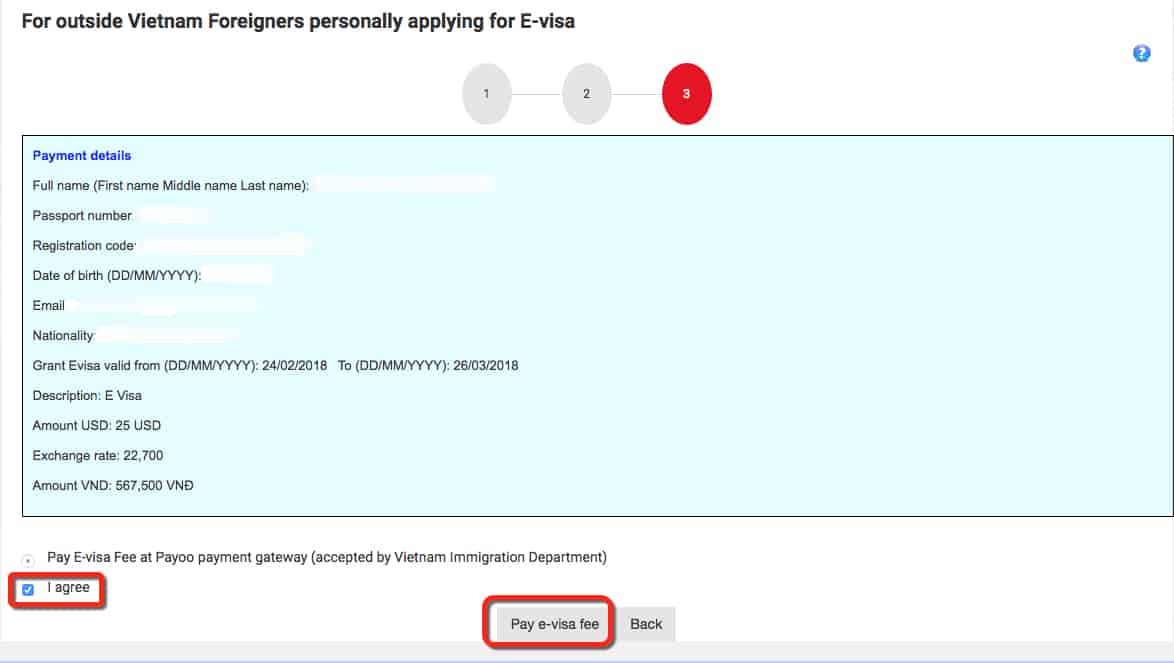
You'll be shown a payment details page. Check "I agree" and click on the gray "Pay e-visa fee" box.
Step 6. Select International Credit/Debit Card
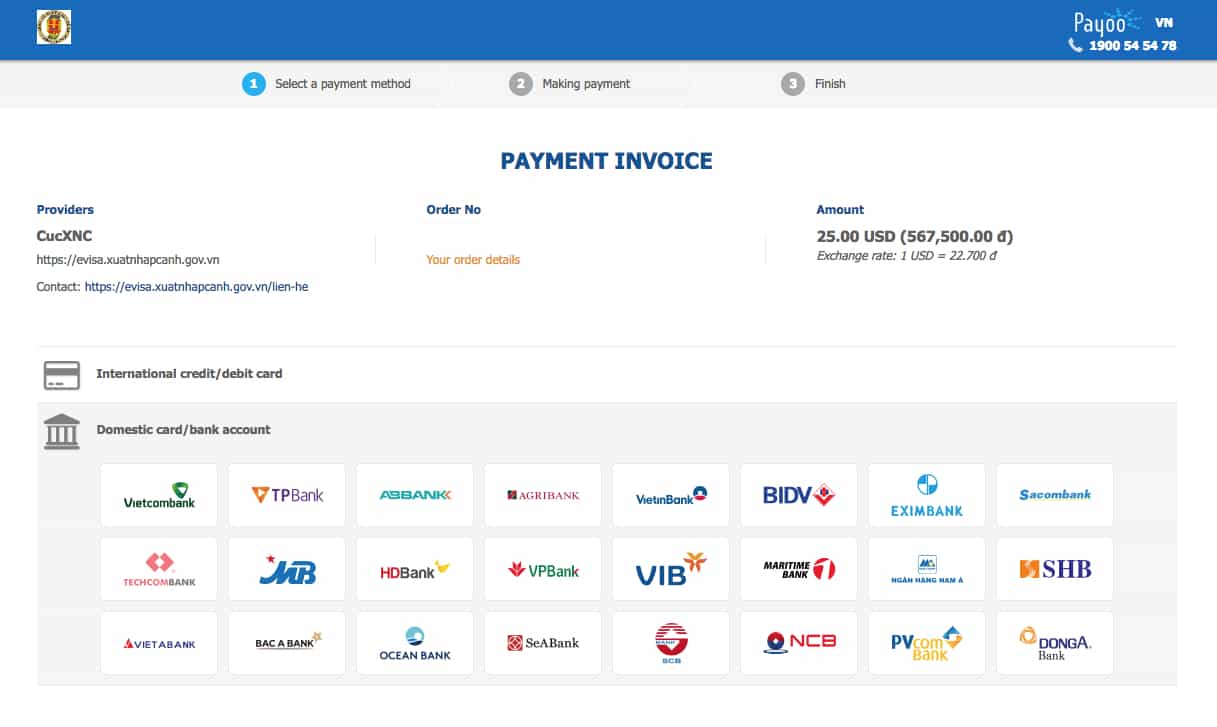
From the payment invoice page, select "International credit/debit card."
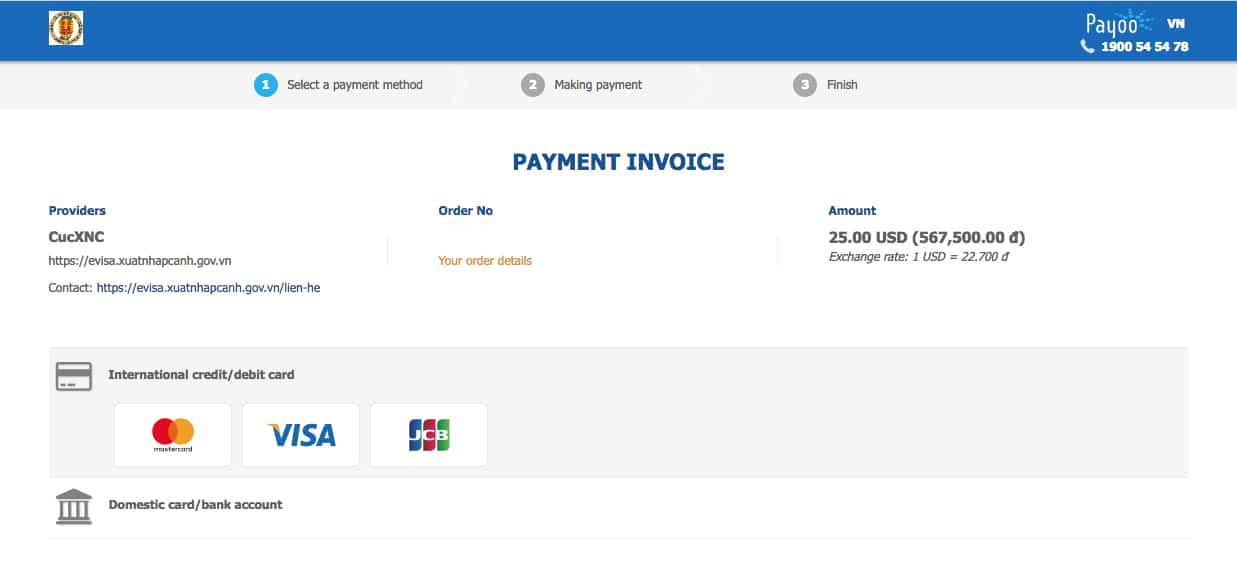
Click on the type of card you're going to use: Mastercard, Visa, or JCB. They don't take American Express or Discover.
Pro-tip: Use a card that doesn't charge foreign transaction fees and earns a travel bonus like the Chase Sapphire Reserve.
Step 7. Enter Credit Card Information

Enter your credit card information and click the blue "Next" button.
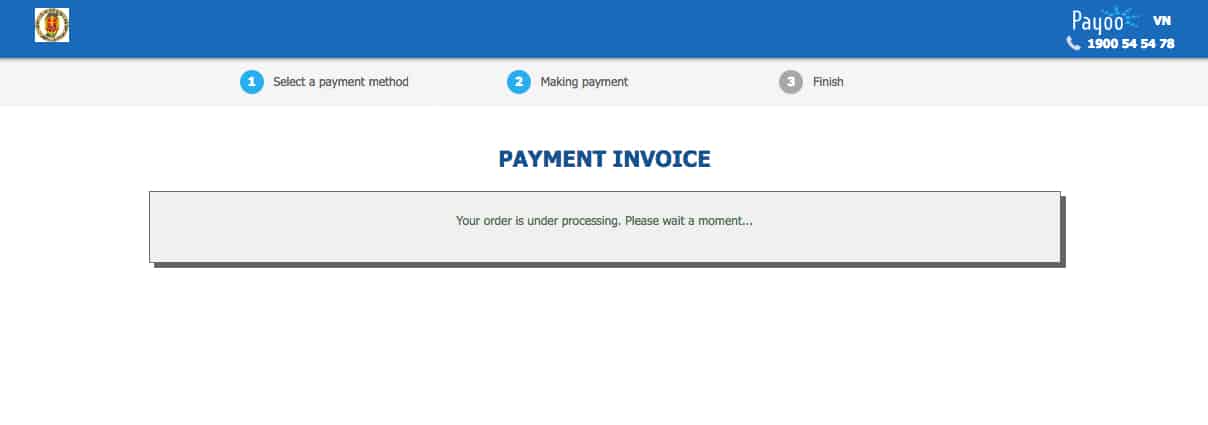
Wait for it to process your order.
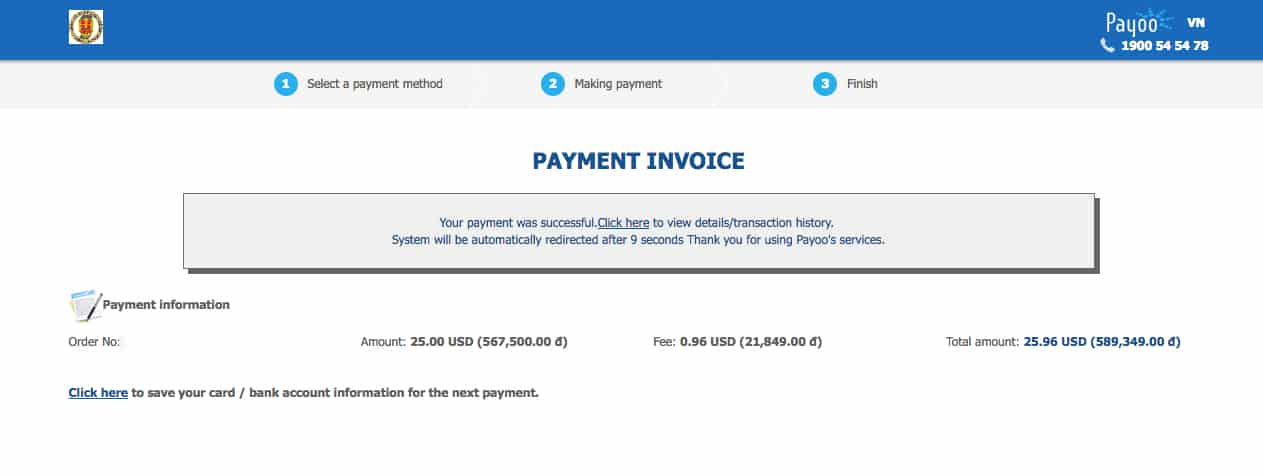
If your payment went through, you'll get a payment was successful page. Wait and you'll be taken to another page.

Check your email within business days and print out your Vietnam Visa.
Don't Make These Common Mistakes
1. Arrival Date
Make sure your arrival date is correct.
Your Vietnam visa is only valid for the date stated on your visa letter.
So if you want a 30-day visa valid for travel from March 1 through March 30, you should specify your arrival date as March 1.
This means you can arrive in Vietnam on March 1 or later.
BUT remember your visa will only be valid for 30 days. So if you arrive on March 5 and planned a 30-day stay, your visa will expire on March 30. Because you put an arrival date of March 1 in your letter.
2. Putting the Wrong Entry and Exit Checkpoint Airport, Landport, or Cruiseport
Double, triple, and quadruple check to make sure you aren't putting the wrong entry or exit checkpoint.
Verify the airport, land port, or cruise port on your Vietnam visa application is correct.
If you applied for your visa for Vietnam at an Embassy, they will charge you for another visa.
People are reporting that when they applied online, they were able to correct the information without additional fees.
3. Extend a Visa
It's hard to extend a visa. It's easier to get it right the first time. Or just get another visa.
Conclusion
If you're traveling to Vietnam, you need a visa to enter the country. Here's how to get a Vietnam visa.
There are five ways you can get a visa to visit Vietnam: online (e-visa), apply in person, by mail, and on arrival.
Applying online and getting an e-visa is easy, quick, and cheap. If you time it right, you can have your Vietnam visa the next day.
Unless you like waiting in line and using your precious vacation days sitting at the airport, avoid getting a visa on arrival.
What's your favorite way to get a Vietnam visa?
Pin this to your travel, travel tips, and Vietnam boards

Comment, tweet, or share this post.
Get the best credit card bonuses.
Follow us on Twitter | Facebook | Pinterest | Instagram | YouTube
Got a question? Or want help, suggestions, travel tips, learn how to travel for free, find out about travel deals, and maximize your miles and points? Use the subscription box below to sign-up and get post updates by email.
Featured image courtesy Ruslan Bardash via Unsplash

Great information. Honestly, perhaps, the best and most detailed explanation of how to get Vietnamese visa I ever read.
I'd like to add couple things though:
1. Visa on arrival - there is a 6 months multiple entry visa for US citizens (currently not listed in your post)
2. There is a service called "Fast Track Airport Service" - they meet you at the airport, take your passport, printed letter and photos and get visa for you. During busiest time it takes about 15 minutes and cost up to $30 USD. (as a disclaimer - I am not affiliated with them, but I used their services in Hanoi)
Cheers!
Thanks for this, we are heading there in a couple of months and will find this info really helpful.
Visas suck!! Why can't all countries have 90-day visas for free?
Hi Kristine,
Yeah! Glad the post helped. It would be nice if we didn't need a visa but I don't mind paying when a country like Vietnam is so cheap to travel within.
This is really thorough! Definitely counter-intuitive for the landing visa. Thank you for researching and sharing this. Vietnam is on our travel wish list and hoping to make it happen in 2020!
The visa requirements for UK citizens keeps changing year after year and its annoying. It looks like the British government are on good terms with Vietnam government, hence a 15 day free visa stay (which I didn't even know about until I read it here)! Its a shame as I want to do 30 days hopefully later this year. I also been to the embassy for my friend to take his passport and visa application last year and by god, it takes fooooorever. Hopefully it will ease up even more in the near future as Vietnam is really opening up to tourism now.
Vietnam is still on our travel wish list. So good to read about how to get a visa. Will flag this for future use. I would definitely want to get a visa in advance of travelling so the eVisa would be best. And it is available in Canada. I did not realize the process for a visa on arrival required so much information. But good to know you can get a visa covering different durations. Thanks for sharing this.
Great tips! Some of these visa processes can be quite complicated and you really need to read the instructions thoroughly. I always wonder about people like me, who have a dual citizenship and have two passports. Can you just decide which passport is more convenient to use? All though, in Vietnam's case, both of my countries are listed so I don't think it would make a difference.
Makes me miss my stay in Vietnam and their foods, too! Lived in Vietnam for a while in 2017-2018 and I can say that getting a visa to this country is relatively easier than any other place. For as long as you have your docs, and pay, you're good to go! This is also useful information for anyone planning to visit the country, wanting to stay long or the like. Missing the pho and ban mi instantly!
Thank you for sharing these tips. We actually visited Vietnam a couple of months ago and had the same experience getting our visa. It's very easy and fast.
Now THAT was a detailed blog. However, I missed why anyone in their right mind would do anything but the online one? I mean why do they even offer the option for mail/email/in-person? Especially because they are so much more expensive and time consuming for all parties.